

Mosaleen
max saleen
performance

Origins
How it works
compatibility
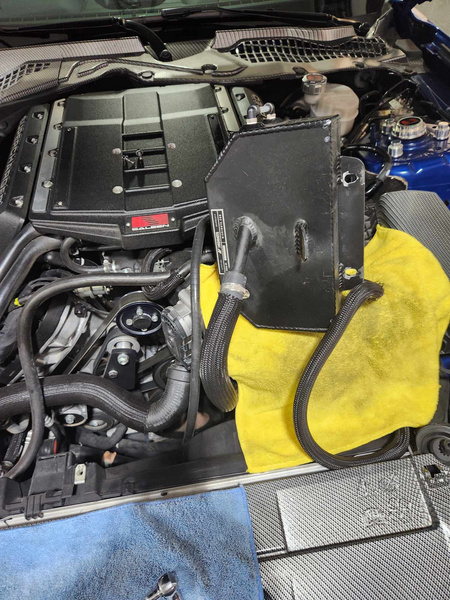
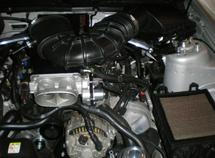
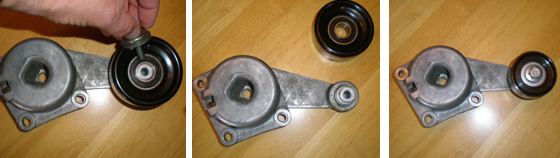
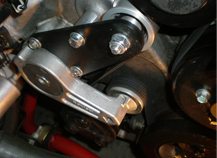
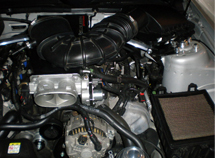
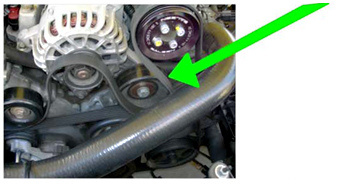
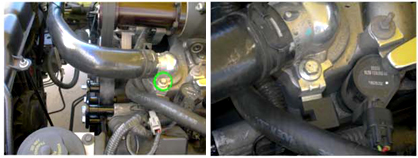
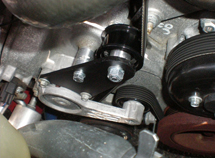
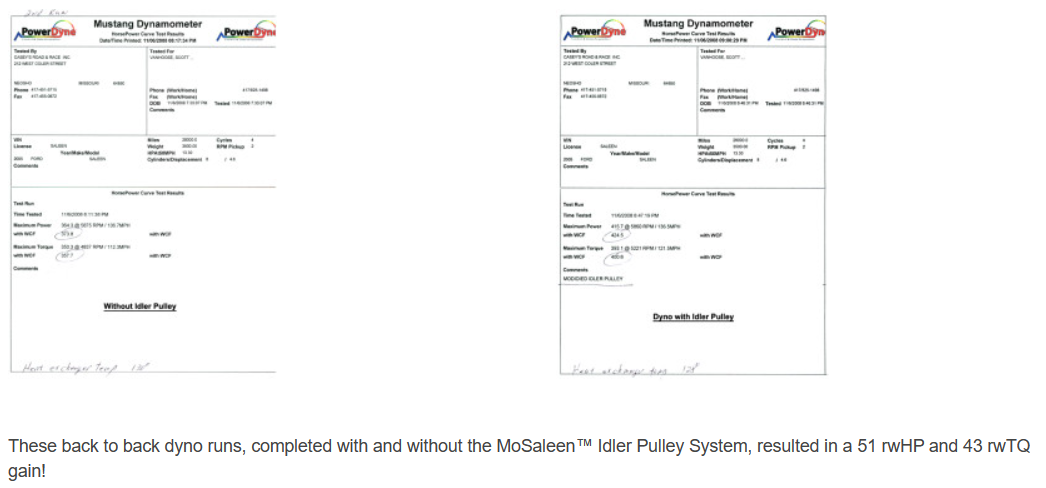
The evidence was there: black rubber dust buildup on the hood and around the supercharger pulley. The belt vibrating up and down under load of travel. I knew that there had to be a better setup, and so, I invented this device to enhance performance.
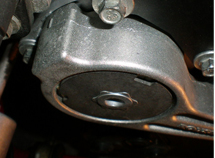
This system secures into the existing bolt holes of your engine, providing more tension on the belt to reduce slippage. Lack of proper tension on the belt can rob your supercharger of boost.
Saleen Mustangs
Roush Mustangs
Ford Racing
Steeda Mustangs
S-331 Trucks
Harley-Davidson Trucks
Edelbrock S/C Mustangs

Installation guide
navigate to your model:

Edelbrock 2650 , 2015 to 2024 5.0 engine Mustang GT
Step 1:
Take both bolts out of overflow tank, rotate it towards drivers side and let it rest on rags.

Step 2:
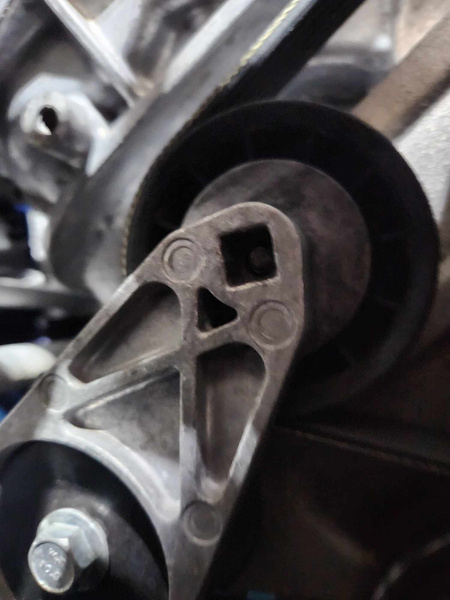
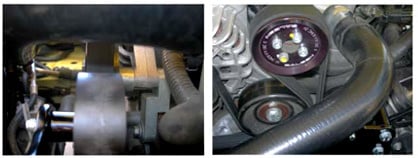
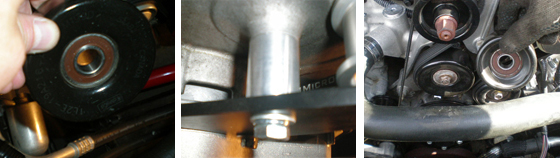
Make a diagram of the belt path so you remember how to put the new belt on. To take the belt off, put ratchet into the square of the tensioner. Rotate the tensioner so you can slip the belt off. To remove the belt and put it back on, take it off the the 2nd idler pulley below SC pulley.
Note: To get belt off tensioner you have to loosen bolt and remove belt off back side.
Step 3:
Put the belt back on. If the stock SC pulley for 2650 Edelbrock SC is 3.25. The stock belt is K060820 and you’ll go with the K060835 RPM belt. Thereafter, you leave the belt on all pulleys except for the 2nd idler pulley below the SC pulley.
Step 4:
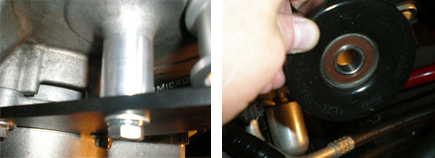
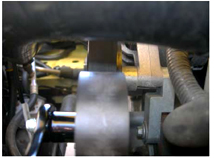
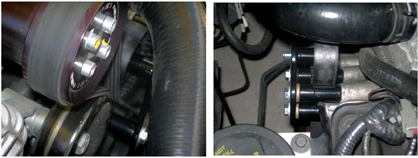
Now to install the Mosaleen pulley. What you’re going to want to do is take the bolt out of the 1st idler pulley below the sc pulley (leave the idler pulley on). And you will take an allen wrench and remove the bolt just above the 1st idler pulley.

Step 5:
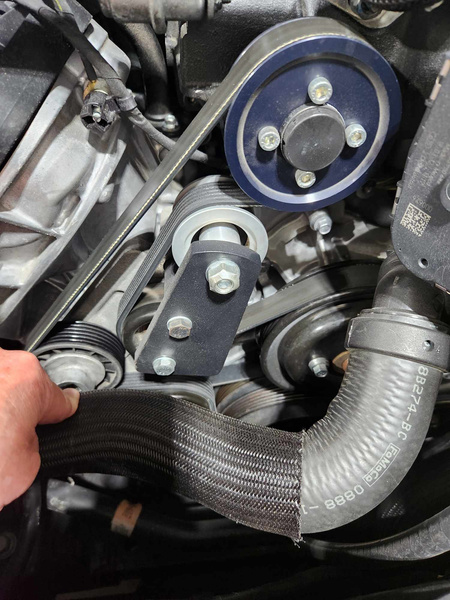
Put the Mosaleen plate and idler facing the engine, and the short spacer and bolt into this pulley and then put a long spacer and bolt into the hole of the first plate and into the hole that you took the long bolt out of.
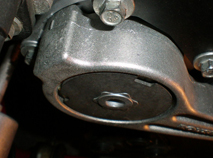
Step 6:
Hold the Mosaleen system in-between the belt and the SC pulley, and before tightening bolts, put a screwdriver flathead or wooden popsicle stick between the 1st idler pulley and the black spacer, then tighten the bolts. This will allow clearance.
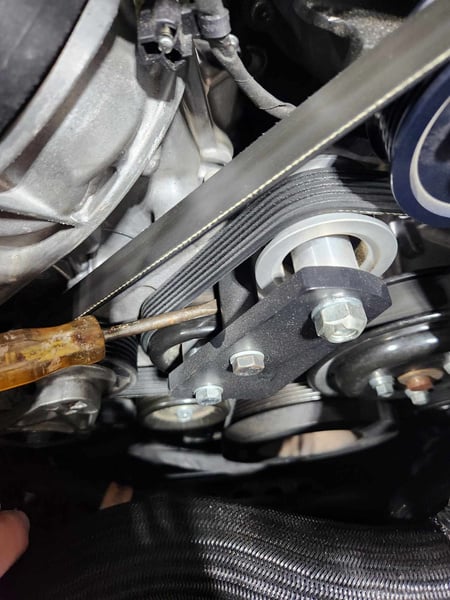
Step 7:
Now slip the belt over the 2nd idler pulley which is behind the radiator hose in the picture. Use the ratchet on the tensioner to give slack in the belt.
05-09 Saleens Installation instructions
Note: You will need to provide a smaller belt for this system. Purchase one that is 1-2 sizes smaller than the one you are using with your stock pulley system.
Step 1:
Remove the air filter cover and CAI tube
Step 2:
Remove the drive belt and alternator.
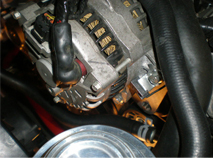
Step 3:
Pull off the stock idler pulley (located just to the left of the S/C pulley) and put on the provided spacer.
Step 4:
Take all three bolts out of the tensioner, remove it and pull off the stock pulley…
Step 5:
Take all three bolts out of the tensioner, remove it and pull off the stock pulley. Install the Mosaleen smooth idler pulley
Step 6:
Reinstall the tensioner by putting all three bolts in. Only tighten the one to the far left.
Step 7:
Take out the other two bolts and place the idler pulley bracket on top of the tensioner with
the pulley facing the engine.
Step 8:
With the bolt holes lined up, you will install the two bolts you pulled out of the tensioner. The third provided bolt goes through the bracket/spacer. Make sure that the other washer is on the outside of the bracket. Tighten up the two tensioner bolts first and then tighten the bracket/spacer bolt.
Step 9:
Reinstall the shorter drive belt, which is 1″ to 1.25″ shorter than you have on now. Reinstall the alternator.
NOTE: When installing the shorter drive belt, put the belt on all of the pulleys except the smooth water pump pulley. Push the tensioner all the way down with a 1/2″ ratchet and then slide the belt over the smooth water pump pulley last.
Step 10:
Reinstall the air filter cover and CAI tube.
Important Amendment for 2002 Saleens
If your Saleen is a 2002, I will need to know what size bolt to include with your system. Ford changed their bolt size on April 15th, 2002 from a 10mm to an 8mm bolt. The bolt is located on the driver’s side and has a stud sticking out of it, next to the valve cover. Pull it out to determine if it is a 10mm or 8mm threaded bolt before calling to place your order.
If you have already ordered the system, you will need to remove the stud and the bolt to be sure they are the same size.
Once the plastic piece is loose you should go ahead and relocate it to the front valve cover bolt. Remove the bolt on the valve cover and mount the plastic piece.
99-04 Saleens
NOTE to 2002 Saleen Owners: Please read the amendment for 2002 models above.
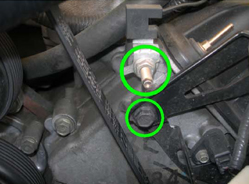
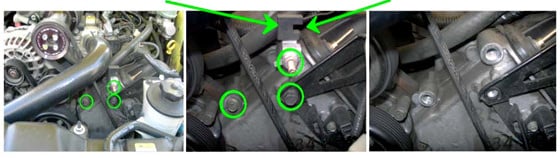
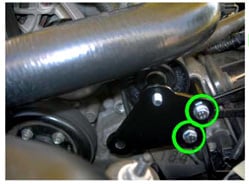
Step 1:
Remove the three bolts shown below. Take the small nut off of the studded bolt. The electronic connector will be relocated later. You will need an 18 mm deep socket to remove this bolt.
Step 2:
Loosen and remove the belt from the smooth pulley.
Step 3:
Use the new bolts and spacers to attach the bracket to the engine. Install the two bolts and spacers indicated below first.
Step 4:
Before installing the 3rd spacer and bolt make sure the belt is between the idler pulley and third spacer.
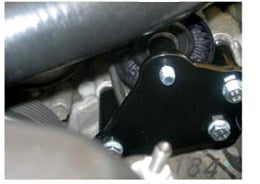
Step 5:
Snug up the bolts and pull the bracket up and to the left so that it lines up the pulley and belt. Once everything is lined up, tighten the three bolts. Put the belt back on by pulling the tensioner up and slipping the belt back over the smooth pulley.
Step 6:
Remove the bolt from the thermostat housing and install the piece from Step 1. Make sure your engine is cold before installation. Alternative place to mount would be the front side of the valve cover bolt.
After the bracket is mounted, the belt should be in the middle, to the backside of the pulley.
On some Series IV’s the belt may not line up in the middle of the pulley. To make it line up you will need to use the enclosed 3 space washers.
Roush Mustangs 05-09
Step 1:
Remove the air filter cover and CAI tube
Step 2:
Remove the driver belt
Step 3:
Pull off the stock idler pulley (located just to the left of the water pump pulley and just above the tensioner) and put on the provided spacer. The pulley you removed will replace the small idler pulley just below the S/C pulley.
Step 4:
Take all three bolts out of the tensioner, remove it and pull off the stock pulley…
Step 5:
Install the pulley provided with your new system onto the tensioner. First loosen the stock tensioner pulley bolt. Remove the stock tensioner pulley and replace it with the new pulley provided with your MoSaleen system.
Step 6:
Reinstall the tensioner by putting all three bolts in. Only tighten the one to the far left.
Step 7:
Take out the other two bolts and place the idler pulley bracket on top of the tensioner with
the pulley facing the engine.
Step 8:
With the bolt holes lined up, you will install the two bolts you pulled out of the tensioner. The third provided bolt goes through the bracket/spacer. Make sure that both washers are on the outside of the bracket. Tighten up the two tensioner bolts first and then tighten the bracket/spacer bolt.
Step 9:
Reinstall the drive belt.
NOTE: When installing the drive belt, put the belt on all of the pulleys except the smooth water pump pulley. Push the tensioner all the way down with a 1/2″ ratchet and then slide the belt over the smooth water pump pulley last.
Step 10:
Reinstall the air filter cover and CAI tube.
choose your system
System for 99-04 Saleens
Compatible with Series I, II, IV and V Superchargers
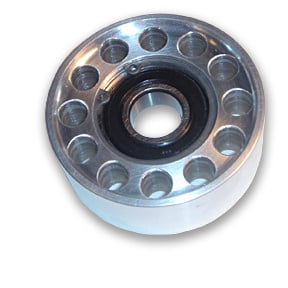
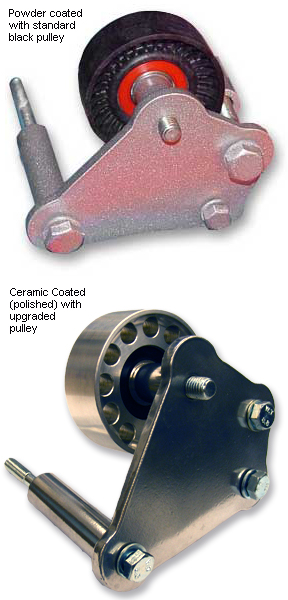
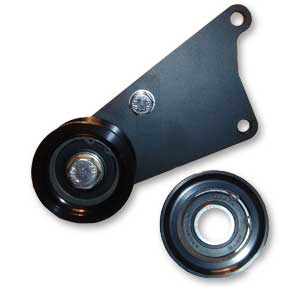
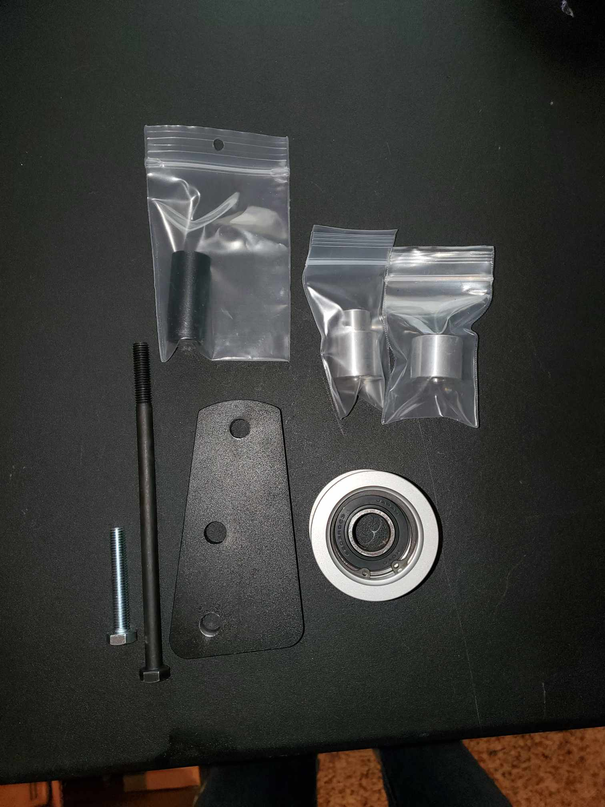
This MoSaleen™ Idler Pulley System is made of metal using grade 8 bolts and a high performance sealed bearing idler pulley. Several different finishes are available for the bracket and spacers, black powder coated (including most colors).
System parts include:
- 1 black double bearing pulley
- 1 Black powder coated bracket
- 4 metal black powder coated spacers
- Combination of 4 8mm or 10mm bolts
- 4 washers
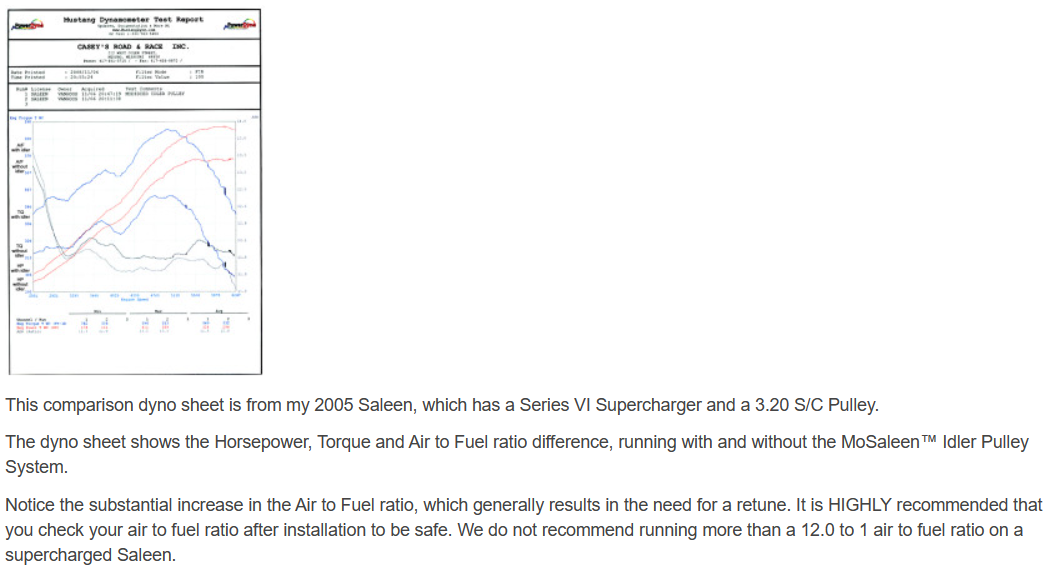
This pulley system is safe to use on a stock Saleen S/C, with a stock supercharger pulley and no modifications. It is HIGHLY recommended that you check your air to fuel ratio after installation to be safe. This is a MUST if you are using a smaller S/C pulley for added boost, or if you have other modifications. We do not recommend running more than a 12.0 to 1 air to fuel ratio on a supercharged Saleen. You should have a tuner device (like a X-Calibrator II) with tunes made for your car.
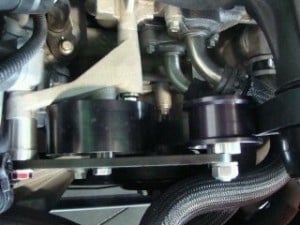
System for 05-10 Saleens With 6 Rib System
Compatible with Roush, Steeda, S-331 Trucks('06-'08), Harley-Davidson Trucks('06-'08) and Edelbrock S/C Mustangs
This MoSaleen™ Idler Pulley System is made of metal using grade 8 bolts and a sealed double bearing idler pulley. The system comes with a black plate. The CNC pulleys are available in aluminum or anodize black finishes.
System parts include:
- 2 CNC aluminum anodized pulleys
- 1 aluminum spacer
- 1 8mm bolt with 1 washer and 1 lock washer
- 1 bracket
- 1 spacer
- 1 10mm bolt
The sealed bearing in this kit is rated at 360 degrees and 12,000 rmp's. I use the system and to date my Saleen has 9000 miles on it with no issues.
You will need to provide a smaller belt for this system. Purchase one that is 1" to 1.25" smaller than the one you are using with your stock pulley system. This system is designed for aftermarket S/C pulleys, System 1, 2.75 to 3.20 - System 2, 3.40 to 3.60. We recommend retuning following installation. We recommend having a dyno tune completed for safety.
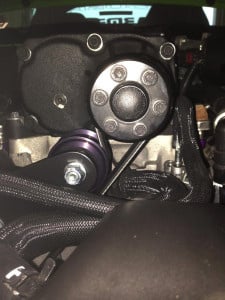
System for 05-10 Saleens With 8 Rib System
Compatible with Roush, Steeda, S-331 Trucks('06-'08), Harley-Davidson Trucks('06-'08) and Edelbrock S/C Mustangs
This MoSaleen™ Idler Pulley System is made of metal using grade 8 bolts and a sealed double bearing idler pulley. The system comes with a black plate. The CNC pulleys are available in aluminum or anodize black finishes.
System parts include:
- 2 CNC aluminum anodized pulleys
- 1 aluminum spacer
- 1 8mm bolt with 1 washer and 1 lock washer
- 1 bracket
- 1 spacer
- 1 10mm bolt
The sealed bearing in this kit is rated at 360 degrees and 12,000 rmp's. I use the system and to date my Saleen has 9000 miles on it with no issues.
You will need to provide a smaller belt for this system. Purchase one that is 1" to 1.25" smaller than the one you are using with your stock pulley system. This system is designed for aftermarket S/C pulleys, System 1, 2.75 to 3.20 - System 2, 3.40 to 3.60. We recommend retuning following installation. We recommend having a dyno tune completed for safety.
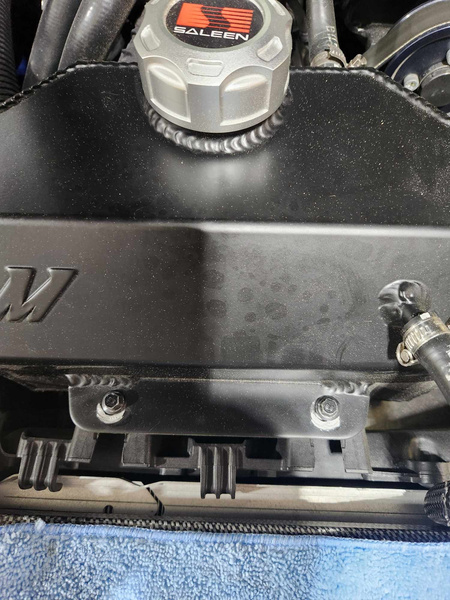
System for Edelbrock 2650 SC 15 to 24 coyote engine
System parts include:
- 1 CNC aluminum anodized pulley
- 2 aluminum spacers
- 1 black powder-coated spacer.
- 1 short 8mm bolt with 1 washer and 1 long 8mm bolt, with washers
- 1 bracket 1 10mm bolt and washer.
Real Testimonies
Michel, 2007 Roush with Idler pulley
"I wanted to let you know that I've put the pulley on my Roush and the result is more then satisfactory. The car has changed its character of performance... much more HPand TQ. My degree of satisfaction is 100/100. Value for money and speed of assembly very very very good. Thank you very much Scott !!!
Note: A +++++++++++++++++++"
Tom, Saleen with 3.00 supercharger pulley
"Hey. I wanted you to know that it works. I made 2 more lbs of boost and not even a bit of belt slip. I'll have in on a dyno next week and send you the results. Thanks man!"
Frank, Saleen with 2.90 supercharger pulley
"I have been running your pulley system on my car and I’m very happy with it. Not only does it look great but it performs quite well. I run a slightly smaller pulley (2.9) and I can get 10 pounds of boost out of my SC. The best thing about your pulley system is the low rpm, around 2500. If I just floor the car at the low rpm my boost jumps past 5 pounds like now, no real waiting. Your pulley system is the best mod that I have made on my car at this point. The day I put the pulley system on my car I noticed the difference in power. I would highly recommend your system to anybody with a 2004 Saleen SC. I now have a small list of mods, 2.9 pulley, MoSaleen pulley system, JLT cold air intake, TR6 plugs, 42 pound injectors, 90mm MAF and a tune by JDM. I can honestly say the pulley system works and works well."


Let the results speak for themselves
Our story
My name is Scott Van Hoose and this is my story
I first got involved with Steve Saleen and the Saleen Company back in 1987. Two years later I was able to buy my first Saleen in 1989 (89-283). Over the years I have owned a total of 5 Saleen’s, 97-052B, 00-210, 01-310, and now the 05-10 Press Car. I have developed quite the relationship with the Saleen family over the years, at car shows, races, events, etc.. So much so that at the 40th Mustang Birthday event I was offered the 2004 press car 04-01 (white with black/yellow striped hood S/C)… well… I had seen Phil Franks drawing of the new 2005 Saleen and I was in love. I asked Steve If I could get this press car, he said it wouldn’t be up for the taking for a while. I told him that “I don’t care, I want it! plus this way I will have time to save money to buy it”.
On March 28, 2007 I got a call from Steve asking if I would like the 2005 Saleen S/C with Scenic glass roof, my heart jumped clean out of my chest, “OH YES”, I said. We talked about the Saleen and its history then after I hung up the phone I realized I didn’t even think to ask him how much, yikes! LOL.
Later I was contacted by Molly Saleen to work out all the details of the sale. Susan (my wife) & I flew into Los Angeles, California on April 12, 2007. While we were there we were invited to tour the Irvine Saleen Plant and got our first glimpse of our new car. We were pleasantly surprised to find the plant was full, wall to wall, of the Parnelli Jones Saleen Mustang, even the paint room. We returned the next day to pick up our car and drive home; the car of my dreams. We have great memories and pictures of the Irvine tour and experience. What a wonderful trip back home we had. And OH! the first airplane we saw over our heads was quite the experience since we had always had hard tops in the past, and bridges are fun too.
2007 to 2011 we went to many Saleen shows and other car shows enjoying the car hobby.
I have a great friend Bobby Ballard that owns Hertz Rent a Car here in Joplin, he let me store my truck and Saleen until insurance could come and look at it. The first insurance adjuster I dealt with was a guy from Louisiana with American Family Insurance. After he said this is just a GT with body parts on it and your insurance says it’s a GT with a 5 K rider on it. I knew this guy and I were not going to have a easy time communicating. Dude, this is a Saleen Mustang! and my agent Steve told me the only way to insure it was to show it as a GT and put two $5000 dollar riders on it. There should be two on it and show as a 2005 GT Premium. I finally told him to get off the property and I would call my agent. I got ahold of Steve he told me he would call Randy Friend the Midwest manger. It wasn’t two hours later and Randy called me and told me not to worry he has my back and will see me in the morning. Then proceeded to tell me he had met me at a local cruise-in in Webb City a few years ago. He had loved the story I told on how I came to own the car and about it being the press car featured in the T.V. show ‘Bachelor’ among other publications. The next day both Randy and Bud (body and paint specialist) showed up and thankfully the meeting went way better than I thought it would. Randy found out what happened with the two riders and fixed it and telling me there shouldn’t be a problem fixing the Saleen especially with the help of Steve Saleen, Greg Wackett, and Mark LaMaskin helping locate hard to find pieces. They both sat in the Saleen and had their pictures taken to put in the American Family news letter. I am so grateful to Randy and everyone that helped.
Ok, now to find the body shop. I called Jody Cook, owner of Cooks Body Shop and car show friend of mine. “Hi Jody”, I said, he jumped in and said “How are you doing Scott? I just want you to know you ARE bringing your Saleen to this shop no matter what. It will be better than it ever was, I promise”.
On the build a few things came up but mostly went as planned. Being the Press car the rear S/C wing mounts were different than the new one we received so we had to re-drill the mounting holes. But nothing could have prepared for me for the drama that was about to unfold replacing the glass roof. We just couldn’t find one and when we did the owner was in Canada but the glass roof was in Washington State and it had some scratches in it. Jody and I did some testing on getting scratches out of glass and it worked so I bought it and had it shipped.
It was to be shipped in a wooden crate and strapped down using three straps onto a pallet but on arrival it was just the wooden crate and the top was opened, sure enough when we pulled it out it was shattered. I was devastated! Thankfully I had bought insurance and got my money back. So back to the drawing board on trying to find a roof. I thought I found one from a person on SOEC living in California but it just wasn’t going to happen. I was just sick so I took the next days off of work to exhaust any option I could think of.
I had learned that the company that makes the Scenic Roof is Guardian and I knew of 3 plants in Michigan. So I started calling each plant, one person at a time. Finally the 39th person I talked to remembered the Saleen order and knew the person at the time in charge of the project. He gave me his name and phone number, Todd Baum, I couldn’t get off the phone fast enough to call him. I was on hold for a while and Todd answered the phone and I told him my story. He told me Saleen ordered 550 Scenic Glass Roofs and that Guardian sent the order to their Ohio plant being a smaller order. He then says “Scott I will be there on Wednesday and I think I will make your day. I will call you as soon as I find out.” Wednesday came and around 11 am Todd called, “Well Scott I am going to make your day I have two Scenic Glass Roofs that had been set aside for blebs but you wont find them”. He proceeded saying he had gotten a call from Steve Saleen stating to send the roof to Scott for cost, I ended up buying both roofs. Todd also told me he had all the tool & die work to make more Scenic Glass Roofs. I sent the information to Molly Saleen in July of 2012. I don’t know what happened but when Susan and I went to the Saleen 10th Annual Nationals in Houston I talked to Steve and he never got the message. We had a great talk and I was able to get the information to him after that. I know works are in progress since Todd emailed me 10/25/13 saying he had been contacted by Saleen. Cool!
One cool surprise was when we were taking the interior out, on removing the door panels I found inside the doors combined 43 tickets to drive a Saleen. I talked to Liz Saleen and was told 05-10 S/C Saleen Mustang was at Galpin Ford In Los Angeles, California in 2006 and individuals would pickup a ticket and put their name on it and wait for the hourly drawing to get a chance to drive the car. The tickets must have been put on the window/door and fell into the door. I saved the best one to put into a glass car show casing and put all 42 back into the doors.
Funny story I have to tell, I was missing my car so much during the 3 month period between the Saleen being painted and interior finished but with no front windshield, rear window, and glass roof installed. AND OH YES I had to drive it! I put my motorcycle helmet on and drove it off and on for the 3 months. Boy did I get some looks! It didn’t take Jody long to finish it up once we finally got the Glass Roof.
It took us 1 year 2 months to rebuild Saleen 05-10. It was worth every minute of it to get it back, and we were able to do so with the Saleen not having a salvage title. I want to thank everyone that had a hand in helping us find parts and moral support. As most know we lost most everything, I had a collection of Saleen history since 1986. Greg Wackett and others put the word out and everyone that had 2nd hand stuff pooled it up to send it to me at a later date when we got settled in. Two years later I have 3/4 of what I lost, not bad at all. Todd from Saleendreams ebay has helped me a lot, Thanks Todd. Thanks in advance Jason Smith for all you do.
- Scott & Susan

Get In Touch
Mailing Address
Scott Van Hoose
5360 Westwind Drive
Loma Linda, MO 64804
Phone Number
417-825-1498
Email Address
svanhoose57@hotmail.com